
Many of you have been asking me why I haven't posted for so long. Well, the truth of it is twofold...one: I am in mourning. My lovely, magical camera was stolen and I didn't want you all to know that I actually am not a very good photographer, it was all the magic camera's doing.
Two: As most of you know at this point, I have gotten myself knocked up. Though I'm luckier than most and this hasn't turned me off eating one bit, it has had the unfortunate effect of moving my bedtime up significantly to, say, 7:30 or 8pm. Well, this leaves very little time for culinary adventures to say the least.
However! I have gotten my hands on a simple little point and shoot and though it doesn't do any tricks or display brilliant colors, it will just have to do to impart to what the food that I'm describing looks like. Unfortunately, for this recipe, I wasn't able to get any photos, so you'll just have to use your imagination!
So, on that note, last week I catered a cocktail party for 60 people. Simple appetizers, but a little special, just because I like to show off. With the fantastic help of sous-chefs Thomas and Lindsey, we made crostini with goat cheese and peach thyme preserves, caprese pops, mini curried chicken pot pies, cucumber carpaccio with smoked salmon mousse, strawberries with marscapone mousse, and polenta bites with walnuts and gorganzola.
I had a hard time decided which I was going to cover in this post, but the polenta is a dish that I think is truly special (and, another favorite adjective, EASY). This is a dish that my mother made, an excellent side dish that was easily converted as a left over.
The dish can be prepared in two ways, with fresh polenta (which shares the consistency of grits or cream of wheat) or with pre-prepared polenta which will have already "solidified" (I say this because I can't think of another way to describe it...) and can be sliced. With the fresh polenta you simply want to cook your semolina (as you would oatmeal) and pour it into your casserole dish, then you sprinkle walnuts and gorganzola on top and finish in the oven. If you don't finish this dish on the first night, then the polenta will "solidify" and you can revive the dish by following the "version 2".
This is the perfect side dish to a rich Chicken Marsala or even a simple grilled steak and the simplicity of it all allows two of my favorite flavors to shine (blue cheese and walnuts).
polenta with walnuts and gorganzola
version 1
serves four with leftovers
1 cup polenta (or corn meal)
4 cups water
1 tsp salt
1 tsp dried thyme or rosemary (optional)
1 cup crumbled gorganzola
1 cup roughly chopped walnuts
salt and pepper for seasoning
-Bring water and salt to boil, slowly whisk in the polenta and stir constantly, cook over medium/medium-low
-Cook until it thickens and pulls away from the pan (about 15 minutes for instant polenta, 30-40 minutes for cornmeal). Stir in thyme/rosemary if using.
- Pour polenta into a casserole/oven-safe serving dish
- sprinkle cheese and walnuts evenly, season with salt and pepper.
- Broil 5-10 minutes, until walnuts are toasted and cheese starts to brown slightly.
Version 2
you will need an additional 4 Tbsp olive oil for this version
If using pre-packaged polenta:
-cut it into 1/2 inch slices
-dip the slices quickly into olive oil
- broil slices for 10 minutes, flipping once
- top each slice with walnuts and cheese
- broil for 5 minutes more.
If using leftovers of version one:
- cut remaining polenta into 1"x1" or 1"x2" pieces
- heat oil in pan, fry bottom of polenta for 10- 15 minutes on medium-low heat (be very careful, it might stick)
- broil for 5 minutes to brown the top.
Saturday, November 20, 2010
Sunday, October 10, 2010
bacon-wrapped figs stuffed with goat cheese

When my friend Lindsey was staying with us a few weeks ago she took inspiration from my fig tree and decided she was going to make something delicious with them.

The combination of sweet fruit, potent cheese and salty bacon (or some other similarly cured meat) is one that we are seeing a lot these days, dates filled with blue cheese and wrapped in proscuitto, cantelope with proscuitto and feta, or this perfect little purse of flavor - figs, stuffed with goat cheese and wrapped in bacon.

This combo is perfect for someone like me who just doesn't love overly sweet things. Even fresh figs on their own are often too much for me, so adding goat cheese and bacon (two of my very favorite things) into the mix adds both acidity and saltiness to round out that sweet.

Beyond the intensely amazing flavor that this trio puts out is the sheer ease of assembly and the delightfully short prep and cooking time. These sweet treats can be ready in minutes and have the class and glamor of a five star event. I think you might be seeing a lot of recipes focusing on ease in the next few months as I focus on growing a little something else (= bun in the oven).

Before the last glimpses of summer are gone - get yourself some fresh figs and a nice, crisp white wine and assemble these little beauties.
RECIPE
bacon-wrapped figs stuffed with goat cheese
makes 10
5 fresh figs
5 slices bacon, cut in half
3 1/2 Tbsp goat cheese
2 Tbsp balsamic vinegar
pinch of salt
- cut the figs in half lengthwise
- divide the goat cheese into 10 equal portions, gently push a portion into the centers of the figs
- wrap the bacon firmly around the fig and cheese
- lay foil on a baking pan, place each fig half on the pan
- broil for about 5-7 minutes (until bacon begins to crisp)
- remove from oven, sprinkle balsamic evenly over figs
- enjoy!
Wednesday, September 22, 2010
lemon poppyseed cake

Oh my gosh, oh my gosh is the date really the 22nd of September already?!?! What happened to August?! I'll tell you what happened, my really, really cute nephew Evan was born (at the end of July) and I just had to rush up to Seattle to see him. Now, there was cooking, there was eating, there was even Sugar & Salt's outrageously good bacon caramels, but there were no blog posts. It just wasn't meant to be.


So now, after a hiatus that was altogether too long, I'm back. Thanks to all of you who sent concerned emails regarding my health and safety, I am still of this earth and still cooking, I was just too dang busy being in love with the most wee, most perfect little man on earth.


So, to the real meat (cake!) of this post - my very own lemon poppyseed cake. When I set out to make this cake originally, I had a very difficult time finding a recipe for it, here I thought this was a common flavor combo, but alas, I pretty much had to greatly redefine an orange poppyseed cake of a completely different style.


However, this cake turned out near perfection. It is so good, especially with the tangy cream cheese frosting that goes on it, that I think it only lasted the day in this household. The lemon gives this cake a sublime freshness and I just love the way poppyseeds go crunch.

lemon cake going...
This cake is perfect for a garden party, a birthday cake or a Sunday baking project that you plan on keeping all to yourself.

lemon cake gone...
lemon poppyseed cake
serves 122 1/4 cups all purpose flour
1 1/4 tsp salt
1 1/2 tsp baking soda
3/4 tsp baking powder
1/4 c poppyseeds (a little more if you like lots o' seeds like me)
1 1/4 c butter, softened
1 3/4 c sugar
1 Tbsp lemon zest
6 lg eggs, separated
1 c plain yogurt (though vanilla would probably be good too)
3 tsp vanilla
1/4 tsp cream of tartar
- preheat the oven to 350 degrees
- sift together the first five ingredients
- cream butter with one cup of sugar and the lemon zest in a large bowl until fluffy
- in a smaller bowl, whisk together the egg yolks, sour cream and vanilla
- beat the flour mixture and the yolk mixture into the butter alternating between the two
-With a clean bowl and clean beaters, beat the egg whites with a pinch of salt until just starting to get foamy, then add the cream of tartar and beat until foamy
- while continuing to beat the mixture, add the remaining cup of sugar until it hold stiff peaks.
- stir about a third of the egg white mixture into the batter to lighted it, the fold in the remaining egg whites gently, but make sure they're all the way incorporated.
-pour the batter into three buttered nine-inch cake pans
- bake 40-45 minutes, until knife comes out of the center clean.
Frost with my whipped cream cheese frosting recipe
Monday, August 2, 2010
chilies stuffed with goat cheese and shrimp
Every year Santa Barbara metamorphoses into a party town with a longing for the traditions of yesteryear in what is called Fiesta. Fiesta, or "Old Spanish Days" as it's also known, is a week-long excuse to drink margaritas, get dressed up in frilly and colorful flamenco-style dresses and yell "viva la fiesta!" and random and odd intervals.

The whole town jumps on board the Fiesta bandwagon, including my neighborhood grocery store which had a temporary "fiesta section" in its coolers, complete with limes, guacamole, carne asada and tequila. Why this grocery store section is temporary is completely beyond me, but hey, there you have it.


So, in the spirit of Fiesta (and also because my fridge decided to kick the bucket on me and I had to use up a lot of the included ingredients) I made stuffed chilies. And can I just say one thing? If you do nothing else for yourself this summer, make these. They are absolute heaven!


I had intended to use poblanos, which is what the recipe I was basing this whole experiment off of suggested, but then our dinner guest count doubled and my local Mexican market (two blocks away, so you'll be seeing a lot of mexican food posts) only had pasillas on hand. So I got some of those, but you know, any color bell pepper would have been delicious with this filling.

The sauce you serve this dish with is as versatile as your pepper choice. The recipe I was borrowing from made a roasted red pepper sauce, which I found to be a little lackluster and would have preferred the tangy bite of a more traditional enchilada sauce. But you probably don't even need a sauce for these as they are full of flavor and moisture already.


So, squeeze some lime over your tequila, stuff yourself some peppers and no matter where you find yourself this week, take a moment to exclaim "viva la fiesta!"

chiles stuffed with goat cheese and shrimp
serves 4
8 peppers (bells, poblano, pasilla, anaheim)
6 oz goat cheese, room temp
1 lb shrimp, cooked, peeled, deveined, and chopped
1 red bell pepper, minced
2 shallots, minced
3 cloves garlic, minced
2 Tbsp cilantro, chopped
2 Tbsp fresh basil, chopped
1/2 tsp salt
1/2 tsp pepper
1/2 cup monterey jack, cheddar or feta cheese for garnish (optional)
- first, you have to scorch the peppers. This is easiest over the gas flame on your gas stove or a bbq, but in a pinch you can use your broiler, just keep a close eye on them.
- place the peppers on the flame and rotate to get them charred and blistered all over. Once they are charred place them in a bowl covered with plastic wrap (or in a ziploc bag) and sweat for about 15-20 minutes. (the peppers should be soft, but not mushy at this point).
- Remove the charred skin of the peppers gently either using your hand or a paring knife (I find hand easier) and discard. You can get a bit more of the skin off by gently wiping the peppers off with a paper towel. DO NOT rinse under water or you will lose the majority of your flavor.
- In a medium-sized bowl, combine all of the remaining ingredients except for the cheese for garnish (if you accidentally throw that into your filling that's ok, it will taste yummy). Again, I find this easiest to mix with your hand, but some vigorous creaming with a spoon could do the trick.
- gently slit each pepper down one side and very gently remove the seed - but leave the stems in tact and attached. Divide your filling into eight portions and spoon a portion into each pepper.
- Line a 9x13 pan with parchment paper and place the peppers on it. Sprinkle monterey jack, cheddar, feta or cotilla cheese on top.
Put the peppers into the oven until warmed through (about 20 minutes) and the cheese is melted.
- You can either serve with your favorite enchilada sauce or eat as is.
Viva La!
Monday, July 12, 2010
roasted grape and goat cheese pizza
I was recently given a mountain of grapes. Out of nowhere, the grape gods opened their hearts and rained their green and red jewels upon me...so much so that we just couldn't finish them in time (before the bowl on my counter spontaneously turned into a winery)...so I had to find something else to use these little beauties for.


I do have a great love for goat cheese, in fact I would probably eat anything if the goat cheese to said "thing" ratio was high enough. But, as is commonly put into practice, goat cheese is remarkably good when paired with sweet things. Something about its creamy tang lends itself well to toning down sugars and so it was an obvious choice for a teammate in my quest to conquer the pile o' grapes.

Now, having just moved into my new favoritest place ever, I haven't exactly been baking with my usual fervor and so, no, I didn't just have a homemade pizza dough lingering around for use in this concoction. But no matter, Trader Joe's (for those of us lucky enough to have access to them) happens to carry delicious, fresh pizza dough in three (yes, THREE!) different flavors (plain, herb and whole wheat). I happen to love, love, love their whole wheat dough and thought that it would be the perfect pairing for my sweet and tart ingredients.


Now, the accessories. Grapes and goat cheese are a great start, but where's the pizazz, the color, the spice? Enter red onion, olive oil and rosemary. done.
This pizza is so simple yet completely satisfying. You can serve it as a meal perhaps with a side salad and a glass of red wine or you can make small individual ones and serve it hors d'oeuvres style (which I plan on doing at an engagement party I've been asked to help cater).


Moral of this story is put this in your repertoire of fast, easy and beautiful dishes do be done in a pinch but where there's no slacking on class.
RECIPE
roasted grape and goat cheese pizza
1 package of whole wheat pizza dough (or you can make your own)
2 cups grapes (you can use green, red or both), halved
2 oz goat cheese
2 Tbsp minced rosemary
2 Tbsp olive oil
1/2 sliced red onion
salt and pepper
- preheat the oven to 500 degrees
-roll out your dough into a pizza pan or cookie sheet, spread the olive oil to cover
- sprinkle grape halves and onion slices evenly over dough
- drop dabs of goat cheese evenly
-sprinkle salt, pepper and rosemary on top.
- bake in the oven for about 10-15 minutes, until the goat cheese turns golden and the crust begins to brown.
Saturday, June 26, 2010
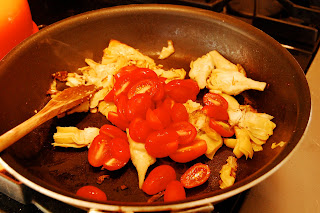
pan-roasted chicken breast with artichoke hearts and tomatoes
Oh my goodness, the last month has been such a whirlwind. Buying a house, selling a condo, moving out of a condo, moving into a house. Needless to say, very little cooking was going on.
But now we're in and, for the most part, the dust has settled. The kitchen resembles less a repository for cardboard boxes and more somewhere where a little culinary magic might just happen.

I was finally able to take a deep breath one evening and whip a little something up with the few ingredients I had on hand. I have this great book called 30-Minute Meals and I was able to adapt a very swift chicken dish that was fit for company.


The beauty of the pan roasted chicken is that it takes no time at all and you get some of that yummy brown stuff on the bottom of your pan to deglaze and use as in your sauce. The artichoke hearts and tomatoes add both color and flavor and make a very mediteranean meal out of pantry staples.

One detail the the books recipe called for the I substituted was bone-in chicken breasts. These do typically have much more flavor and if you can find them, they work great. I, however, usually only have the boneless kind in my freezer and so I went with those - all turned out just fine.

I served this accompanied with blanched green beans and biscuits and it was truly a delicious 30-minute meal.
4 chicken breasts (bone in or out)
olive oil - about 5 Tbsp
1 large jar artichoke hearts (10+ ounces)
1 pint cherry tomatoes
3 Tbsp fresh lemon juice
2 garlic cloves, minced
2 tsp dried oregano
1 tsp dried (or fresh) thyme
2 pinches red pepper flakes
salt and pepper to taste
-preheat the oven to 450 degrees
-put 1-2 Tbsp oil in the skillet and heat
-season the chicken with salt and pepper and brown on both sides (about 5 minutes total)
-transfer the chicken to the oven and bake for 15 minutes (closer to 20 if using bone-in), until the thermometer reads 160 degrees
- toss the artichokes with salt and pepper and thyme and oregano. Add more oil to the skillet and heat, then brown the artichokes, stirring occasionally (about 8 minutes), then add in tomatoes until just wilted (2 minutes)
-spread artichoke and tomato mixture over the chicken breasts
-whisk together remaining olive oil with the lemon juice, garlic and pepper flakes, drizzle over chicken when serving.
-
But now we're in and, for the most part, the dust has settled. The kitchen resembles less a repository for cardboard boxes and more somewhere where a little culinary magic might just happen.

I was finally able to take a deep breath one evening and whip a little something up with the few ingredients I had on hand. I have this great book called 30-Minute Meals and I was able to adapt a very swift chicken dish that was fit for company.


The beauty of the pan roasted chicken is that it takes no time at all and you get some of that yummy brown stuff on the bottom of your pan to deglaze and use as in your sauce. The artichoke hearts and tomatoes add both color and flavor and make a very mediteranean meal out of pantry staples.


One detail the the books recipe called for the I substituted was bone-in chicken breasts. These do typically have much more flavor and if you can find them, they work great. I, however, usually only have the boneless kind in my freezer and so I went with those - all turned out just fine.

I served this accompanied with blanched green beans and biscuits and it was truly a delicious 30-minute meal.
pan-roasted chicken breasts with artichoke hearts and tomatoes
serves 4
4 chicken breasts (bone in or out)
olive oil - about 5 Tbsp
1 large jar artichoke hearts (10+ ounces)
1 pint cherry tomatoes
3 Tbsp fresh lemon juice
2 garlic cloves, minced
2 tsp dried oregano
1 tsp dried (or fresh) thyme
2 pinches red pepper flakes
salt and pepper to taste
-preheat the oven to 450 degrees
-put 1-2 Tbsp oil in the skillet and heat
-season the chicken with salt and pepper and brown on both sides (about 5 minutes total)
-transfer the chicken to the oven and bake for 15 minutes (closer to 20 if using bone-in), until the thermometer reads 160 degrees
- toss the artichokes with salt and pepper and thyme and oregano. Add more oil to the skillet and heat, then brown the artichokes, stirring occasionally (about 8 minutes), then add in tomatoes until just wilted (2 minutes)
-spread artichoke and tomato mixture over the chicken breasts
-whisk together remaining olive oil with the lemon juice, garlic and pepper flakes, drizzle over chicken when serving.
-
Tuesday, May 25, 2010
roasted cauliflower with almonds and raisins

Where o' where have been you all ask, well let me tell you it has been a time of culinary dearth! We are moving in less than a week and the condo has been on the market for just over a week. We have made it squeaky clean, including the kitchen, in an effort to "neutralize" the place prompting Thomas to impose a "no cooking" ordinance (and, afterall, he does do most of the cleaning...).

So, needless to say, there has been very little to post coming out of my kitchen and it has been sad for me. The fridge is looking a little grim as we are trying to limit the amount of dead weight we move out of here.
sad, sad fridge...except for the chinese takeout!
However, I did have a lonely little cauliflower in the fridge, a relic from the last farm box we received before pausing it until the new house and I decided that it was high time to use it. And then an interesting thing happened - as though it was an old standby from my repertoire a recipe formulated so concretely in my head (divine inspiration?). I followed it step by step and I've got to tell you it has got to be one of my favorite new side dishes (plus I almost always have the necessary ingredients in my pantry!).


RECIPE
roasted cauliflower with almonds and raisins
serves four as a side dish1 head of cauliflower
4 Tbsp olive oil
1-2 tsp salt
1/2 cup roasted almonds (whole or slivered)
1/2 cup raisins
1/4 cup chopped cilantro
- set oven to 400 degrees
- cut cauliflower into bite-sized florettes
- toss with salt and olive oil, place on baking tray
- roast for about 20 minutes (until the edges start to turn golden brown - sprinkle with almonds and raisins, return to oven for another 5 minutes (the raisins will get golden and puffy)
- remove from oven and sprinkle with cilantro
Subscribe to:
Posts (Atom)