Monday, March 29, 2010

postlet - a simple suggestion for lemon curd

a great number of you have asked me what my favorite way to eat and serve lemon curd is, that is other than spooning heaping mounds of it directly into my mouth, and I must say that it's in tart form.

 the naked tart

The curd is sinfully good on a simple shortcrust pastry, however, I prefer it on a ginger crust just to give it that extra kick. The best part about my ginger crust is that it's two ingredients, yep, two! And so this tart is done in minutes (that is, if you already have the curd on hand).


I also like to dress the tart up a bit at the end, and you can really have a lot of fun with this (especially if you're obsessively aesthetically minded like I am). When I make these tarts in individual tart shells I like to take my brulee torch and give the tart a crisp sugar coating that goes crunch when you tap it with your fork (this is also my favorite part of eating creme brulee). On a bigger tart this doesn't work quite as well. It's still beautifully appealing, but a little messy when you cut slices into it. Blueberries or raspberries, a dusting of powdered sugar or even cocoa powder are all great substitutions here.

a crunchy brulee crust

 you think we liked it?

RECIPE

lemon tart on ginger snap crust
serves 8

2 x recipe for lemon curd
2 cups ginger snaps (I really like to use Trader Joe's triple ginger cookies so try and find these if you can, but if you can't any ginger snap will do)
4 Tbsp butter, melted

- preheat the oven to 375 degrees
- butter a ten inch false bottom tart pan (or three false bottom 3-inch tart pans)
- in a food processor or blender whiz the ginger snaps for about 20 seconds
- pour in the melted butter, whiz until totally combined (about 20 more seconds)
- press the crust into the tart pan using your fingers or the back of a spoon. Bake for about 20 minutes, or until fragrant
- remove from oven and press down once more to make sure you still have you tart edges (they might have melted into the bottom crust during cooking.
- pour in the lemon curd and place in the fridge for an hour.

options:
- for the brulee top, generously sprinkle granulated sugar on top of the tart so that it is completely covered and white. Using a kitchen torch, melt the sugar until a light golden brown and so there is no more "white" sugar visible.
- otherwise, finely dust powdered sugar and/or cocoa powder, or top with fresh berries.

Thursday, March 25, 2010

little bites of sunshine...

my friend has the most glorious ranch in the Santa Ynez valley that has on it the most glorious free-range, milk fed cattle. But this post is not about her fabulous beef, that story is to come later, but it's about her meyer lemon tree that is so fruitful it is more yellow than green.

this is how many lemons I started with

On a recent visit to said ranch for a little Sunday afternoon horseback riding she brought out a standard grocery bag and we proceeded to fill it, I mean fill it with lemons. The lady of the house, my friend's grandmother, had planted this tree when she first bought the ranch decades ago. As it grew and produced more offspring, she perfected a secret lemonade recipe that is simply outstanding. The thought of recreating this recipe and using all of the lemons this way was truly tempting, but just not quite enough of a challenge.


So, I decided to make some long-lasting, versatile ingredients that I could make in large quantities, I mean look at all of those lemons! This way, when the apocalyse hits, I will at least be prepared with my sweet and savory lemons. However, both of these recipes could have been made in single batches with just a few lemons.


Lemon curd is a childhood favorite of mine. My mother used to make it every once in a while and we would eat it by the spoonful, maybe with blueberries, but most likely just on its own. My favorite thing to do with the curd now is to pour it into a tart shell and enjoy it by the slice. But I also like to serve it in ramikens with ginger cookies and it's even spellbinding on toast.


My desire to jaunt into the savory brought me to preserve many of my lemons in salt, a fate they will hold for the next three to six months, at which point I once heard that tasting them will be like seeing God. I don't know what seeing God is like, but it sounds pretty good to me.

this is how many lemons I had after the curd...yeah, I've got a lot of work to do...

Preserved lemons are commonly used in Moroccan cooking, but also go well when minced and sprinkled on salads. They have a beguiling flavor that is well worth the long wait it takes before they are ready.

RECIPES

lemon curd
makes about a cup

1/2 c freshly squeezed lemon juice
2 tsp lemon zest
1/2 c sugar
6 Tbsp butter
3 eggs plus an extra egg yolk

- in a heavy saucepan, over medium heat whisk together the lemon juice, zest and sugar.
- add in the butter and cook until melted
- add the eggs slowly while whisking rapidly, this will avoid too much scalded egg
- keep stirring frequently until the first bubbles start to appear and the whisk lines don't immediately disappear.
- immediately pour the mixture through a fine meshed sieve into a small bowl
- place plastic wrap on the surface of the curve (so a skin doesn't form) and refrigerate for at least an hour
curd will keep refrigerated for a week, or you can can it and it will last indefinitely.

moroccan style preserved lemons

3-4 lemons
3 cups of kosher salt 
optional: a cinnamon stick or cloves
a large, wide-mouthed jar

- place 3/4 inch salt in the bottom of your jar
- slice the lemons into four wedges lengthwise
- fit the lemon wedges into the jar as snuggly as possible, but without the slices sticking back together
- pour the rest of the salt over the lemons so that they are completely covered
- leave covered for at least a month, but they only get better with time so try to at least wait three months, or better yet 6-9 months and then maybe you too will see God...

Monday, March 15, 2010

blueberry pie and the camera's fixed!


Yay! The camera's fixed! Hopefully we'll get some better pictures out of it!

The rainstorms have passed here in Santa Barbara and there is a definite hint of summer in the air. All of a sudden I yearn for bar-b-ques, the lingering smell of sun screen and sunshine late into the evening. When summer starts to peak out through the clouds I start thinking about frolicking in the fields in shorts and bare feet just like the little girl in the childhood classic "Blueberries for Sal". And, of course, that gets me to thinking about blueberry pie because, truly, there are few things that epitomize summer like fresh blueberry pie.

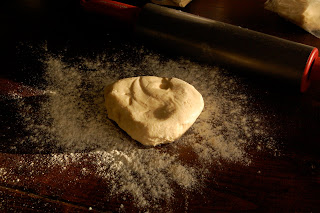
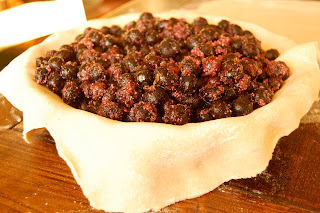
The best way to transfer pie dough from the surface where you've rolled it out is to fold it into fourths and unfold it in your pie dish, that way there's less risk of it ripping


 Luckily for me, there are good-quality frozen blueberries that allow you to satisfy these summer urges, even in mid-March. The best thing about this particular blueberry pie is the ease with which it is prepared. It takes little time, especially if you have any prepared pie dough on hand. I also like to add a few little unusual twists to my blueberry pie.


You often see blueberries paired with lemon, but I actually prefer it with orange...I find it has a sweeter, spicier flavor. I also prefer to use brown sugar over white sugar, it's got a much rounder caramelized flavor.


Another little trick I wanted to call out here is something I learned from my mother. Whenever there was surplus dough after your pie is all assembled, you can make yourself a lovely teatime treat, that I call pinwheels. It's as simple as rolling out the excess dough and sprinkling it with brown sugar and cinnamon. Roll up the whole thing and slice it. Bake it in the oven with your pie for about 10-15 minutes.


I enjoyed this pie so much that I actually made it twice in one week. With each slice it seemed that summer just got a little bit closer.


RECIPE

simple blueberry pie
serves 10

sweet shortcrust
1 1/4 cup all purpose flour
1/2 cup whole wheat flour
1 Tbsp brown sugar
1/2 tsp salt
3/4 cup cold butter, diced
5-6 Tbsp ice water

- put the dry ingredients into the food processor and mix until blended
- add the butter pieces and pulse five or six times
- add in 4 Tbsp of ice water and pulse about 10 times, or until the dough forms a ball. If the ball doesn't form, add more ice water.
- separate the dough into two equal portions and form them into discs a chill for at least one hour, but ideally longer.
(this dough will freeze for several months)

filling
 6 cups blueberries (fresh or frozen)
the zest and juice of one orange
3/4 - 1 cup of brown sugar (depending on how sweet you like your pie)
4-5 Tbsp of tapioca or flour starch

- mix all of the filling ingredients together
- place one pastry disc on a floured surface and sprinkle flour on top of it.
- roll the disk out until it's about 1/4 inch thick
- place the dough into the pie pan and pour in the filling
- roll out the other piece of dough and place it on top of the filling. Pinch the two piece of dough together all the way around the pan. Cut four slits in the center.
- bake at 425 degrees for 25 minutes and then lower the temperature to 375 degrees for an additional 30 minutes.
- let cool 20 minutes before cutting into the pie.

Friday, March 12, 2010

the season of citrus - blood orange polenta upside down cake!

 When one moves to Southern California, one must get used to many things - near perfect weather, the unrealistic prevalence of blond hair and an outrageous amount of citrus for the better part of the year. At first there is a giddy sense of excitement when this abundance presents itself, but as trees bare their weight in fruit and more and more of it carpets the ground, you can really start to scratch your head and wonder what the heck else can I do with this stuff?!?!


Now, as if they heard the call, Bon Appetit included a gorgeous dessert in its latest issue that showcases citrus in a tempting and scrumptuously rustic way.  You take a little polenta, a little orange and some caramel and you've got yourself a date with citrus. Not only is this cake aesthetically gorgeous, it's also a delight to eat.


I actually made this cake twice to test whether one of its steps was actually necessary - the whipping and subsequent folding in of the egg whites into the cake batter (really, if this step was not a must, I was definitely going to omit it)...well, it turns out it is definitely a good idea to include this step. The first cake, which included the whipped egg whites was light and airy - somewhat surprising given that it has a bunch of cornmeal in it. The second cake was much denser and chewier. Lesson learned.


Though I think this cake is really at its finest with the blood oranges, I did try it with lemons and blueberries in one iteration and it was still very good. I found that the key was to very thinly slice the orange or lemon slices (using a mandolin seemed to work well) so that you don't get big mouthfuls of pith.


Lastly, the Bon Appetit recipe recommends whipped creme fresh as the accompaniment for this cake, and it is very good - but a brandy whipped cream or even just vanilla yogurt was also rather nice.

RECIPE


blood orange polenta upside down cake
adapted from Bon Appetit - March, 2009
  
 - 6 tablespoons sugar, divided, plus 3/4 cup sugar 
 - 3 tablespoons water
 - 8 tablespoons (1 stick) unsalted butter, room temperature, divided 
 - 3 unpeeled small to medium blood oranges 
 - 3/4 cup plus 3 tablespoons unbleached all purpose flour 
 - 4 tablespoons polenta or coarse yellow cornmeal (preferably stone-ground) 
 - 1 1/2 teaspoons baking powder 
 - 1/4 teaspoon coarse kosher salt 
 - 1 teaspoon vanilla extract 
 - 2 large eggs, separated 
 - 6 tablespoons whole milk

  - Position rack in center of oven and preheat to 350°F.
  - Combine 6 tablespoons sugar and 3 tablespoons water in 10-inch diameter ovenproof skillet with 2 1/2-inch-high sides.
  - Stir over medium heat until sugar dissolves. Increase heat and boil without stirring until syrup is golden amber (not dark amber), occasionally brushing down sides of skillet with wet pastry brush and swirling skillet, about 4 minutes. Remove skillet from heat and whisk 2 tablespoons butter into caramel. Set aside.
  - Cut the ends off the oranges. Using sharp knife or mandolin, cut oranges into 1/16- to 1/8-inch thick rounds. Remove and discard any seeds.
  - Arrange orange slices, overlapping slightly, in concentric circles atop caramel in bottom of skillet, leaving no gaps between slices (or else cake batter will come through - see picture of finished cake).
  - Beat together 3/4 cup sugar, remaining 6 tablespoons room-temperature butter, and vanilla in another medium bowl until light and fluffy. Add egg yolks 1 at a time, beating well after each addition.
  - Add flour mixture in 3 additions alternately with milk in 2 additions, beating batter just until incorporated.
  - Using clean dry beaters, beat egg whites in large bowl until stiff but not dry. Fold 1/3 of egg whites into batter to lighten, then fold in remaining egg whites in 2 additions.
  - Drop batter by large spoonfuls atop orange slices in skillet, then spread evenly. Don't pour the batter into the pan because you will risk displacing the orange slices
  - Bake cake until tester inserted into center comes out clean, about 45 minutes.
  - Cool cake in skillet 10 minutes. Run small knife around cake to loosen. Place platter atop skillet. Using oven mitts, hold platter and skillet firmly together and invert, allowing cake to settle onto platter.
  - Rearrange any orange slices that may have become dislodged. Cool cake completely at room temperature.

Serve with:
whipped creme fraiche ( beat together 1 container of creme fraiche - about 8oz and 2 1/2 Tbsp sugar until thick)
brandied whipped cream (beat together 1 1/2 cups heavy whipping cream and 2 Tbsp brandy until stiff peaks form)
vanilla yogurt (don't need to do anything!)

Friday, March 5, 2010

chanterelles + flaky crust = paradise

You hear people say that Santa Barbara is paradise, especially people from Santa Barbara. Now, I'm a firm believer in the fact that each person's paradise is their own, especially having grown up in the Northwest and loving everything about it (yes, even the rain).

However, when a friend came by the other day wielding a paper sack FULL of local chanterelle mushrooms, well I couldn't help but think "I guess Santa Barbara is paradise," (I mean we have 70 degree weather 362 days out of the year and chanterelles grow here - I'm sold!) and then proceeded to make a mental list of all of the deliciously decadent ways I could prepare these little pillows of goodness.

 The mighty Chanterelle

Now anyone unfamiliar with the Chanterelle, you need to try them now. Even if you're not a fan of mushrooms, these are different...so different. Chanterelles are a light orange color and have flat tops and have not one, but two soul mates - cream and garlic.Yes, they can be a little expensive, but you don't need a whole lot of them to impart a ton of flavor.


I think that my favorite way to prepare chanterelles is in a cream sauce for pasta, but this time I decided to do something different. This time I decided to make a tart with them and combine them with the lovely head of cauliflower that I received in my box this week. Now the challenge of being able to whip up a tart after work on a school night is being able to make a good enough crust in a small enough amount of time. After some searching around, I've found a recipe (see below) that is super simple and is flaky and tasty after only an hour's chilling time.


Next, an important thing to note about all mushrooms is that they are like 99% water (not really, but you get the gist). That means that they either need to be sweated first or your method of cooking them either calls for the mushroom water (as in pasta sauce) or your going to cook it down sufficiently enough. For this tart I chose to pre-saute the mushroom so as to get rid of as much of the water as possible. That way I didn't end up with goopy tart.

 like i said, paradise

The rest from there is just tossing the ingredients into the pan, letting the flavors infuse and popping it into a tart shell...couple that with a nice glass of Chardonnay and you've got paradise just about anywhere...

RECIPES

pate brise (shortcrust pastry)
for a 9-10 inch tart/pie

1 1/4 cups of flour
1/2 tsp salt
1/2 cup (1 stick) unsalted butter, cubed
5-8 Tbsp iced water
*if you want to make a sweet crust, add 1 Tbsp sugar in with the dry ingredients


- put dry ingredients into the food processor and whiz a few times
- add the cubed butter to the food processor and pulse about 5 or 6 times
- add 5 Tbsp of iced water and pulse 8-10 times, the dough should come together into a ball that is only lightly wet. If you need more water, add it in, one Tbsp at a time.
- shape the dough into a disc, handling it as little as possible, and place it in plastic wrap (I like Ziploc bags for this).
- refrigerate the dough at least one hour or up to overnight.
- to roll out the dough, place a generous amount of flour on the work surface. Place the dough disc atop the flour and then sprinkle flour on top of the dough.
- roll the dough out. Once you've got the dough rolled out an inch on all sides, add a bit more flour to the dough. This will prevent it from sticking to your rolling pin.
- now your dough is ready for use.

Chanterelle and Cauliflower Tart
serves 4-6

1/2 lb fresh chanterelle mushrooms
2 Tbsp butter
1 medium onion, diced
2 cloves garlic, minced
1 tsp dried thyme (1 Tbsp fresh)
1 head cauliflower, cut into small bite-sized pieces
1/2 cup white wine
1/2 cup heavy cream
salt and pepper to taste

- preheat oven to 350 degrees
- Cut this chanterelles into 1/2 inch strips. Place them in a saute pan over medium-high heat and saute until the majority of the water has come out of them
- pour off the water and set the mushroom aside.
- place the butter in the pan and add onions. Cook until translucent and add the garlic and thyme. Saute another 2 minutes.
- return the mushrooms to the pan and add the cauliflower. Saute until the cauliflower just starts to get golden.
- add the white wine and cream. Cook down to about a 1/4 cup (or so that it pretty much just coats the mushrooms and cauliflower), this should take about 8-10 minutes.
- place your rolled out tart crust into a ten inch tart pan and place the filling in the crust.
- bake your tart for 30 to 40 minutes and remove from the oven. Let sit for 10 minutes before slicing.

Thursday, March 4, 2010

the cyber art of feeding

The more I do this blogging thing the more complex it gets. It started out as an idea. An idea about wanting to wax on and on about food. And now, it's bordering on an obsession - mostly fueled by the fact that there are people out there (you) who actually kinda like reading what I have to say about food.

So, now I find myself playing with borders and fonts, looking a different blog templates and getting really into taking pictures (yep, this is why it bothers me so much that my camera is still in the shop). All of this is to try and make the blog more appealing to you - so if somethin's missing, let me know!

The latest thing that a few people have asked for now is a way to receive emails when a new post goes up. When I first started the blog I had Blogspot's little gadget for showing off followers which would also allow people to sign up and follow but I found that it made the blog a little too busy - especially as more of you started following (it shows cute little pics of each follower), so I took it off.

BUT I've found a much more understated way of allowing you to get these updates and it's called Feeding. Isn't that perfect?!?! So, if you want to be cyber-fed by me, then go ahead and click on the link on the upper right hand of the blog and type in your email address.

Shockingly enough, Red Door Epicure is already up to over 20 followers! Thanks to whoever you are and I look forward to blogging with you!

Stay tuned to later in the day for chantrelle and cauliflower tart...